I've heard from a few people who are having difficulties opening the pdf file on my previous post for the Storefronts Quilt Pattern. After getting some technical advice, it seems that perhaps not everyone has the necessary support systems to open the document. I originally decided to share this pattern as a pdf because I didn't want it to be such a long blog post and especially since the main cutting chart required such a small font to fit correctly. I want everyone to have access to the pattern, though, so a blog post we will do! Sew and enjoy!
Finished Size: 49 x 60”
Block size: 14” square
Materials & Cutting Requirements
If you have trouble matching up the lines in the "for" column with the "cutting" column, just double check the measurement charts for each separate block further on in the pattern which are larger and easier to read!
Fabric
|
For
|
Cutting
|
Fat quarter Merchandise in Pink
|
Store #2a windows
Store #4a window
Store #4b window
Store #6b windows
|
2 rectangles 3 1/2 x 5 1/2”
1 rectangle 4 1/2 x 7 1/2”
1 rectangle 4 1/2 x 7 1/2”
2 rectangles 3 1/2 x 4 1/2”
|
Fat quarter Merchandise in Green
|
Store #1a window
Store #3b window
Store #5b window
Store #6a window
|
1 rectangle 4 1/2 x 7 1/2”
1 rectangle 4 1/2 x 7 1/2”
1 rectangle 4 1/2 x 7 1/2”
2 rectangles 3 1/2 x 4 1/2”
|
Fat quarter Merchandise in Yellow
|
Store #1b window
Store #2b window
Store #3a window
Store #5a window
|
1 rectangle 4 1/2 x 7 1/2”
2 rectangles 3 1/2 x 5 1/2”
1 rectangle 4 1/2 x 7 1/2”
1 rectangle 4 1/2 x 7 1/2”
|
4 yards Packaging in Pink
|
Store #2a sign
Store #6a sign
Quilt backing
|
1 rectangle 3 1/2 x 4 1/2”
1 square 4 1/2 x 4 1/2”
2 rectangles 26 x 62”
|
1/8 yard Packaging in Green
|
Store #1b sign
Store #6b sign
|
1 rectangle 3 1/2 x 6 1/2”
1 square 4 1/2 x 4 1/2”
|
1/8 yard Packaging in Blue
|
Store #1a sign
Store #2b sign
|
1 rectangle 3 1/2 x 6 1/2”
1 rectangle 3 1/2 x 4 1/2”
|
Fat eighth Receipts in Pink
|
Store #1a roof
Store #5a roof
Store #6a building
Store #1b roof
|
2 strips 1 1/2 x 3 1/2”
3 rectangles 2 1/2 x 4 1/2”
4 strips 1 1/2 x 4 1/2”
2 strips 1 1/2 x 5 1/2”
1 strip 1 1/2 x 12 1/2”
2 strips 1 1/2 x 2 1/2”
|
Fat quarter Receipts in Green
|
Store #4a building
Store #6a roof
Store #2b building
|
1 strip 1 1/2 x 12 1/2”
1 strip 1 1/2 x 5 1/2”
2 strips 1 1/2 x 4 1/2”
1 strip 1 1/2 x 9 1/2”
2 strips 1 1/2 x 3 1/2”
1 strip 1 1/2 x 12 1/2”
1 strip 1 1/2 x 2 1/2”
6 strips 1 1/2 x 5 1/2”
|
1/8 yard Receipts in Blue
|
Store #4a roof
Store #6b roof
Store #4b roof
|
3 squares 2 1/2 x 2 1/2”
6 squares 1 1/2 x 1 1/2”
2 rectangles 2 1/2 x 3 1/2”
2 strips 1 1/2 x 12”
|
1/8 yard Price Tags in Blue
|
Store #5a building
|
1 strip 1 1/2 x 12 1/2”
1 strip 1 1/2 x 5 1/2”
2 strips 1 1/2 x 4 1/2”
1 strip 1 1/2 x 9 1/2”
|
1/8 yard Price Tags in Yellow
|
Store #2a building
Store #3a roof
Store #3b roof
Store #5b roof
|
1 strip 1 1/2 x 12 1/2”
1 strip 1 1/2 x 2 1/2”
6 strips 1 1/2 x 5 1/2”
24 squares 1 1/2 x 1 1/2”
2 strips 1 1/2 x 12 1/2”
3 rectangles 2 1/2 x 4 1/2”
|
Fat Quarter Price Tags in Pink
|
Store #2b roof
Store #5b building
|
1 strip 1 1/2 x 14 1/2”
1 strip 1 1/2 x 12 1/2”
1 strip 1 1/2 x 5 1/2”
2 strips 1 1/2 x 4 1/2”
1 strip 1 1/2 x 9 1/2”
|
1/8 yard Vintage Floral in Blue
|
Store #2a roof
Store #3a roof
Store #6b roof
|
1 strip 1 1/2 x 14 1/2”
6 squares 2 1/2 x 2 1/2”
2 strips 1 1/2 x 3 1/2”
|
1/2 yard Vintage Floral in Red
|
Store #1a building
Store #5a roof
Store #3b roof
Store #2b roof
Store #1b roof
Quilt binding
|
1 strip 1 1/2 x 12 1/2”
1 strip 1 1/2 x 5 1/2”
2 strips 1 1/2 x 4 1/2”
1 strip 1 1/2 x 9 1/2”
3 rectangles 2 1/2 x 4 1/2”
6 squares 2 1/2 x 2 1/2”
2 rectangles 2 1/2 x 4 1/2”
1 strip 1 1/2 x 12 1/2”
6 strips 2 1/4” x WOF
|
Fat quarter Vintage Floral in Yellow
|
Store #3a roof
Store #6b building
Store #5b roof
Store #4b building
|
2 strips 1 1/2 x 12 1/2”
4 strips 1 1/2 x 4 1/2”
2 strips 1 1/2 x 5 1/2”
1 strip 1 1/2 x 12 1/2”
3 rectangles 2 1/2 x 4 1/2”
1 strip 1 1/2 x 12 1/2”
1 strip 1 1/2 x 5 1/2”
2 strips 1 1/2 x 4 1/2”
1 strip 1 1/2 x 9 1/2”
|
1/8 yard Checklist in Pink
|
Store #3b building
Store #1b roof
|
1 strip 1 1/2 x 12 1/2”
1 strip 1 1/2 x 5 1/2”
2 strips 1 1/2 x 4 1/2”
1 strip 1 1/2 x 9 1/2”
2 strips 1 1/2 x 3 1/2”
|
1/8 yard Checklist in Green
|
Store #4a roof
Store #6a roof
|
2 strips 1 1/2 x 12 1/2”
2 rectangles 2 1/2 x 3 1/2”
|
1/3 yard Checklist in Blue
|
Store #2a roof
Store #3a building
Store #3b roof
Store #1b building
Store #4b roof
|
2 rectangles 2 1/2 x 4 1/2”
1 strip 1 1/2 x 12 1/2”
1 strip 1 1/2 x 5 1/2”
2 strips 1 1/2 x 4 1/2”
1 strip 1 1/2 x 9 1/2”
24 squares 1 1/2 x 1 1/2”
1 strip 1 1/2 x 12 1/2”
1 strip 1 1/2 x 5 1/2”
2 strips 1 1/2 x 4 1/2”
1 strip 1 1/2 x 9 1/2”
3 squares 2 1/2 x 2 1/2”
6 squares 1 1/2 x 1 1/2”
|
1/8 yard Diamonds in Blue
|
Store #1a roof
|
2 strips 1 1/2 x 2 1/2”
1 strip 1 1/2 x 12 1/2”
|
1/8 yard Diamonds in Pink
|
Store #4a roof
|
3 squares 2 1/2 x 2 1/2”
6 squares 1 1/2 x 1 1/2”
|
1/8 yard Diamonds in Yellow
|
Store #4b roof
|
3 squares 2 1/2 x 2 1/2”
6 squares 1 1/2 x 1 1/2”
|
1 yard Swiss Dot (white background, black dots)
|
Store #1 background (cut 2 sets)
Store #2 background (cut 2 sets)
Store #3 background (cut 2 sets)
Store #4 background (cut 2 sets)
Store #5 background (cut 2 sets)
Store #6 background (cut 2 sets)
Background sashing for lower edge
Background sashing for side edges
|
2 squares 1 1/2 x 1 1/2”
2 strips 1 1/2 x 3 1/2”
1 rectangle 3 1/2 x 14 1/2”
2 strips 1 1/2 x 10 1/2”
2 strips 1 1/2 x 7 1/2”
2 strips 1 1/2 x 4 1/2”
2 strips 1 1/2 x 3 1/2”
1 rectangle 2 1/2 x 14 1/2”
2 strips 1 1/2 x 10 1/2”
1 rectangle 3 1/2 x 14 1/2”
2 strips 1 1/2 x 10 1/2”
1 rectangle 3 1/2 x 14 1/2”
2 strips 1 1/2 x 10 1/2”
1 rectangle 3 1/2 x 14 1/2”
2 strips 1 1/2 x 10 1/2”
2 strips 1 1/2 x 3 1/2”
2 strips 1 1/2 x 4 1/2”
1 rectangle 3 1/2 x 14 1/2”
1 rectangle 3 1/2 x WOF
1 rectangle 3 1/2 x 7”
4 rectangles 3 1/2 x 30”
|
Fat quarter Swiss Dot (black background, white dots)
|
Store doors
|
12 rectangles 2 1/2 x 5 1/2”
|
1/8 yard Swiss Dot (gray background, white dots)
|
Sidewalks
|
12 strips 1 1/2 x 14 1/2”
|
4 yards Batting (or twin size packaged batting)
|
Quilt sandwich
|
1 rectangle 51 x 62”
|
Note: All seams are 1/4”. Press seams either open or toward the darker fabric.
Make the Blocks
Store #1 (Make 2)
Part of Block
|
Letter
|
Size of Piece
|
Building
|
A
|
2 strips 1 1/2 x 4 1/2”
|
B
|
1 strip 1 1/2 x 9 1/2”
|
C
|
1 strip 1 1/2 x 5 1/2”
|
D
|
1 strip 1 1/2 x 12 1/2”
|
Window
|
E
|
1 rectangle 4 1/2 x 7 1/2”
|
Door
|
F
|
1 rectangle 2 1/2 x 5 1/2”
|
Roof
|
G
|
1 strip 1 1/2 x 12 1/2”
|
H
|
2 strips 1 1/2 x 3 1/2”
|
I
|
2 strips 1 1/2 x 2 1/2”
|
Sign
|
J
|
1 rectangle 3 1/2 x 6 1/2”
|
Sidewalk
|
K
|
1 strip 1 1/2 x 14 1/2”
|
Background
|
L
|
2 squares 1 1/2 x 1 1/2”
|
M
|
2 strips 1 1/2 x 3 1/2”
|
N
|
1 rectangle 3 1/2 x 14 1/2”
|
O
|
2 strips 1 1/2 x 10 1/2”
|
Piecing Instructions
1. Assemble the building.
Sew two A strips to either short side of E rectangle.
Sew B strip to lower edge of window unit.
Sew F rectangle to the right edge of the unit and C strip to the right edge of F.
Sew D strip to the upper edge of the unit.
2. Assemble the roof.
Sew L square to the left short end of one I strip. Sew L square to the right short end of the other I strip
Sew an H strip to the lower long edge of each roof unit (making sure that L squares are pointed toward the outer edges of the block.
Sew an M strip to the upper long edge of each roof unit.
Sew a roof unit to each short side of J rectangle (see diagram for placement).
Sew strip G to the lower edge of the roof unit.
Sew the lower edge of roof unit to the upper edge of building unit
3. Finish the block.
Sew O strips to right and left edges of building unit.
Sew K strip to lower edge of building unit.
Sew N rectangle to upper edge of building unit.
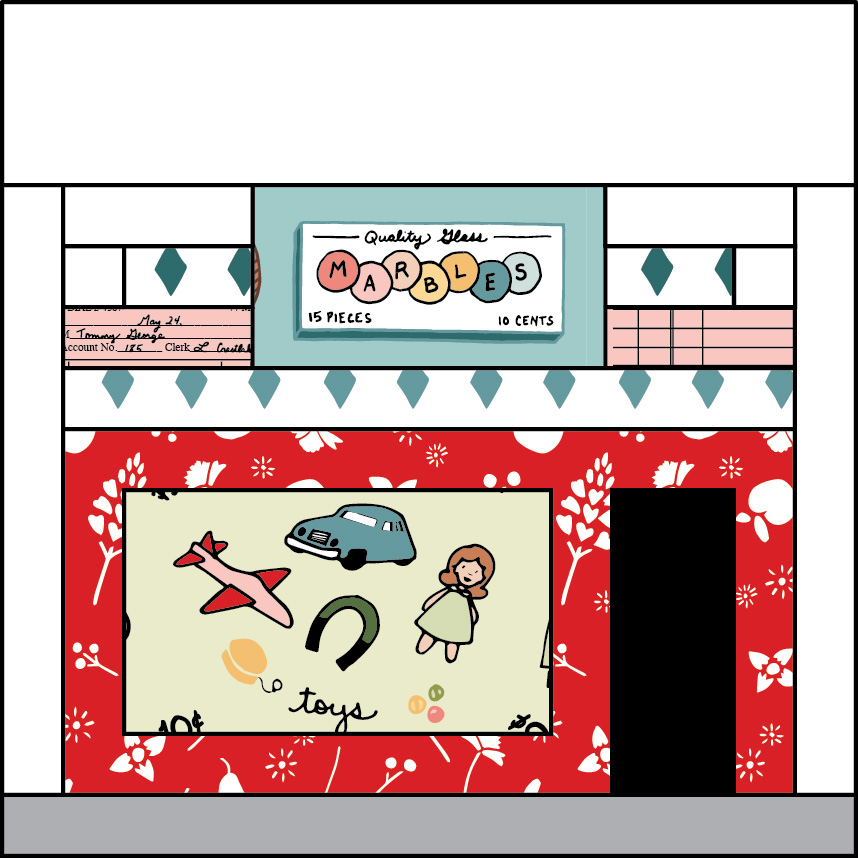
Store #2 (Make 2)
Part of Block
|
Letter
|
Size of Piece
|
Building
|
A
|
1 strip 1 1/2 x 12 1/2”
|
B
|
1 strip 1 1/2 x 2 1/2”
|
C
|
6 strips 1 1/2 x 5 1/2”
|
Windows
|
D
|
2 rectangles 3 1/2 x 5 1/2”
|
Door
|
E
|
1 rectangle 2 1/2 x 5 1/2”
|
Roof
|
F
|
1 strip 1 1/2 x 14 1/2”
|
G
|
2 rectangles 2 1/2 x 4 1/2”
|
Sign
|
H
|
1 rectangle 3 1/2 x 4 1/2”
|
Sidewalk
|
I
|
1 strip 1 1/2 x 14 1/2”
|
Background
|
J
|
2 strips 1 1/2 x 7 1/2”
|
K
|
2 strips 1 1/2 x 4 1/2”
|
L
|
2 strips 1 1/2 x 3 1/2”
|
M
|
1 rectangle 2 1/2 x 14 1/2”
|
Piecing Instructions
1. Assemble the building.
Sew a strip C on either long side of each rectangle D, giving you 2 window units.
Sew the remaining C strips to the lower edge of each window unit.
Sew strip B to the upper edge of rectangle E to make the door unit.
Sew a window unit to the left and right edges of the door unit.
Sew strip A to the upper edge of the building unit.
2. Assemble the roof.
Sew a strip K to the upper long edge of each rectangle G.
Sew a roof unit to the left and right edges of rectangle H.
Sew a strip L to the left and right edges of the roof unit.
Sew strip F to the lower edge of the roof unit.
Sew rectangle M to the upper edge of the roof unit.
3. Finish the block
Sew a strip J to the left and right edges of the building unit.
Sew strip I to the lower edge of the building unit.
Sew the roof unit to the upper edge of the building unit.
Store #3 (make 2)
Part of Block
|
Letter
|
Size of Piece
|
Building
|
A
|
1 strip 1 1/2 x 12 1/2”
|
B
|
1 strip 1 1/2 x 5 1/2”
|
C
|
2 strips 1 1/2 x 4 1/2”
|
D
|
1 strip 1 1/2 x 9 1/2”
|
Window
|
E
|
1 rectangle 4 1/2 x 7 1/2”
|
Door
|
F
|
1 rectangle 2 1/2 x 5 1/2”
|
Roof
|
G
|
24 squares 1 1/2 x 1 1/2”
|
H
|
6 squares 2 1/2 x 2 1/2”
|
I
|
2 strips 1 1/2 x 12 1/2”
|
Sidewalk
|
J
|
1 strip 1 1/2 x 14 1/2”
|
Background
|
K
|
2 strips 1 1/2 x 10 1/2”
|
L
|
1 rectangle 3 1/2 x 14 1/2”
|
Piecing Instructions
1. Assemble the building.
Sew a strip C on either long side of rectangle E.
Sew strip D to the lower edge of the window unit.
Sew strip B to the left edge of rectangle F.
Sew the door unit to the left edge of the window unit.
Sew strip A to the upper edge of the building unit.
2. Assemble the roof.
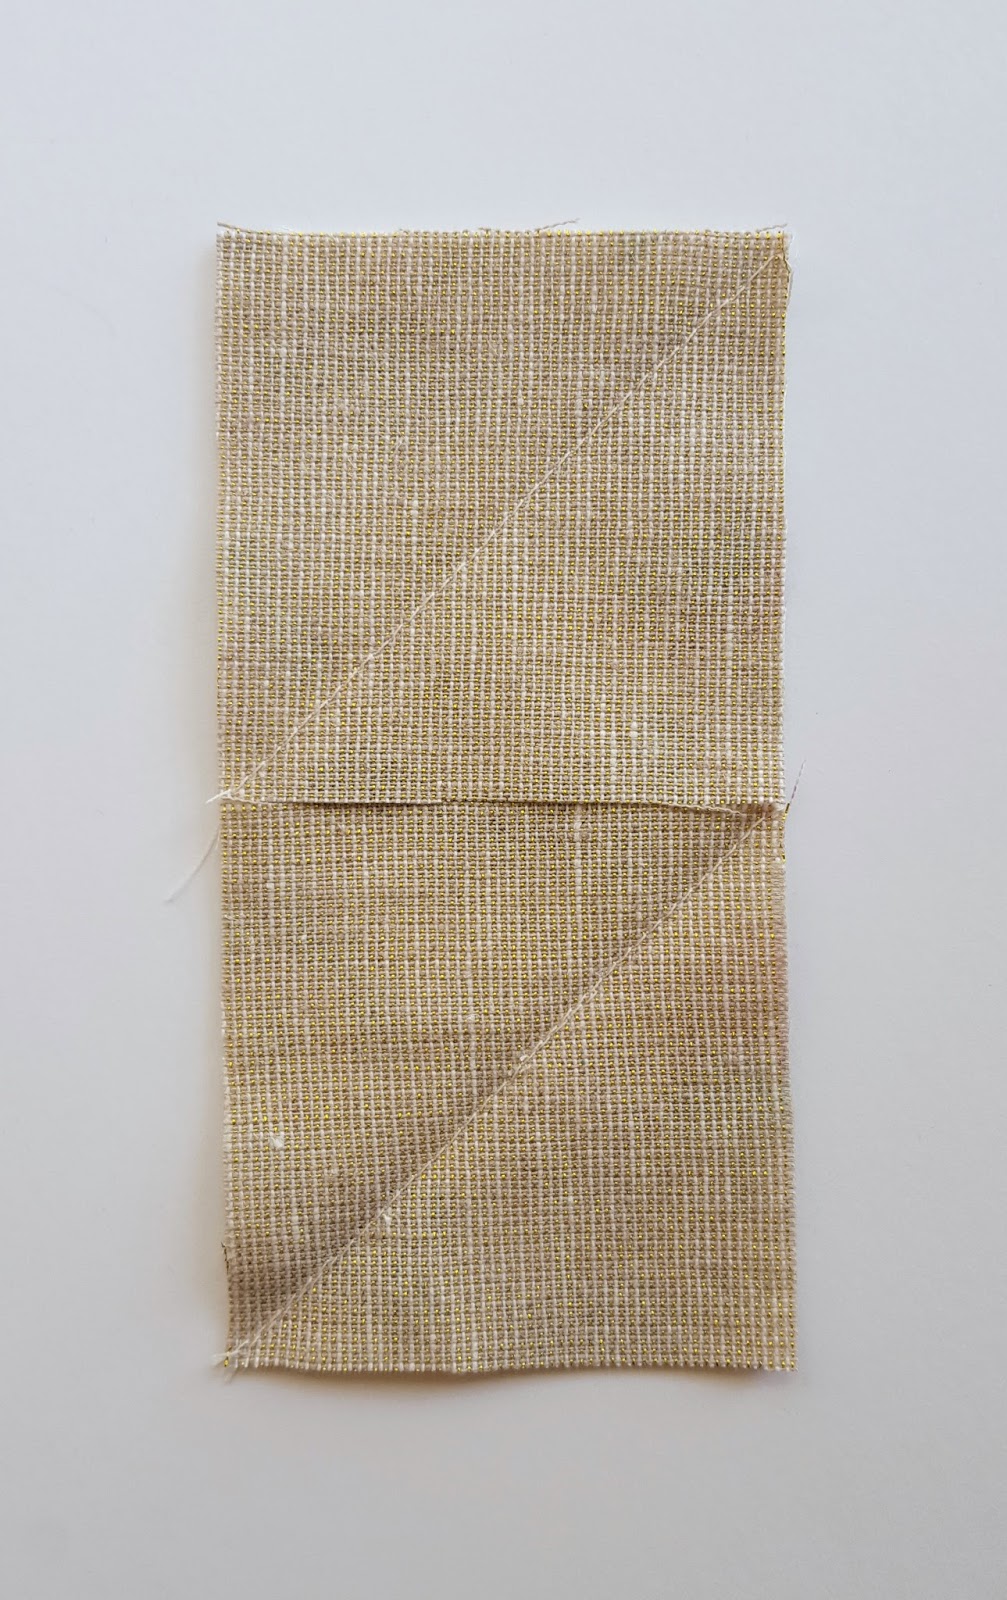
Draw a diagonal line from corner to corner on the back side of each G square or simply press each square in half diagonally, creating that line with your iron.
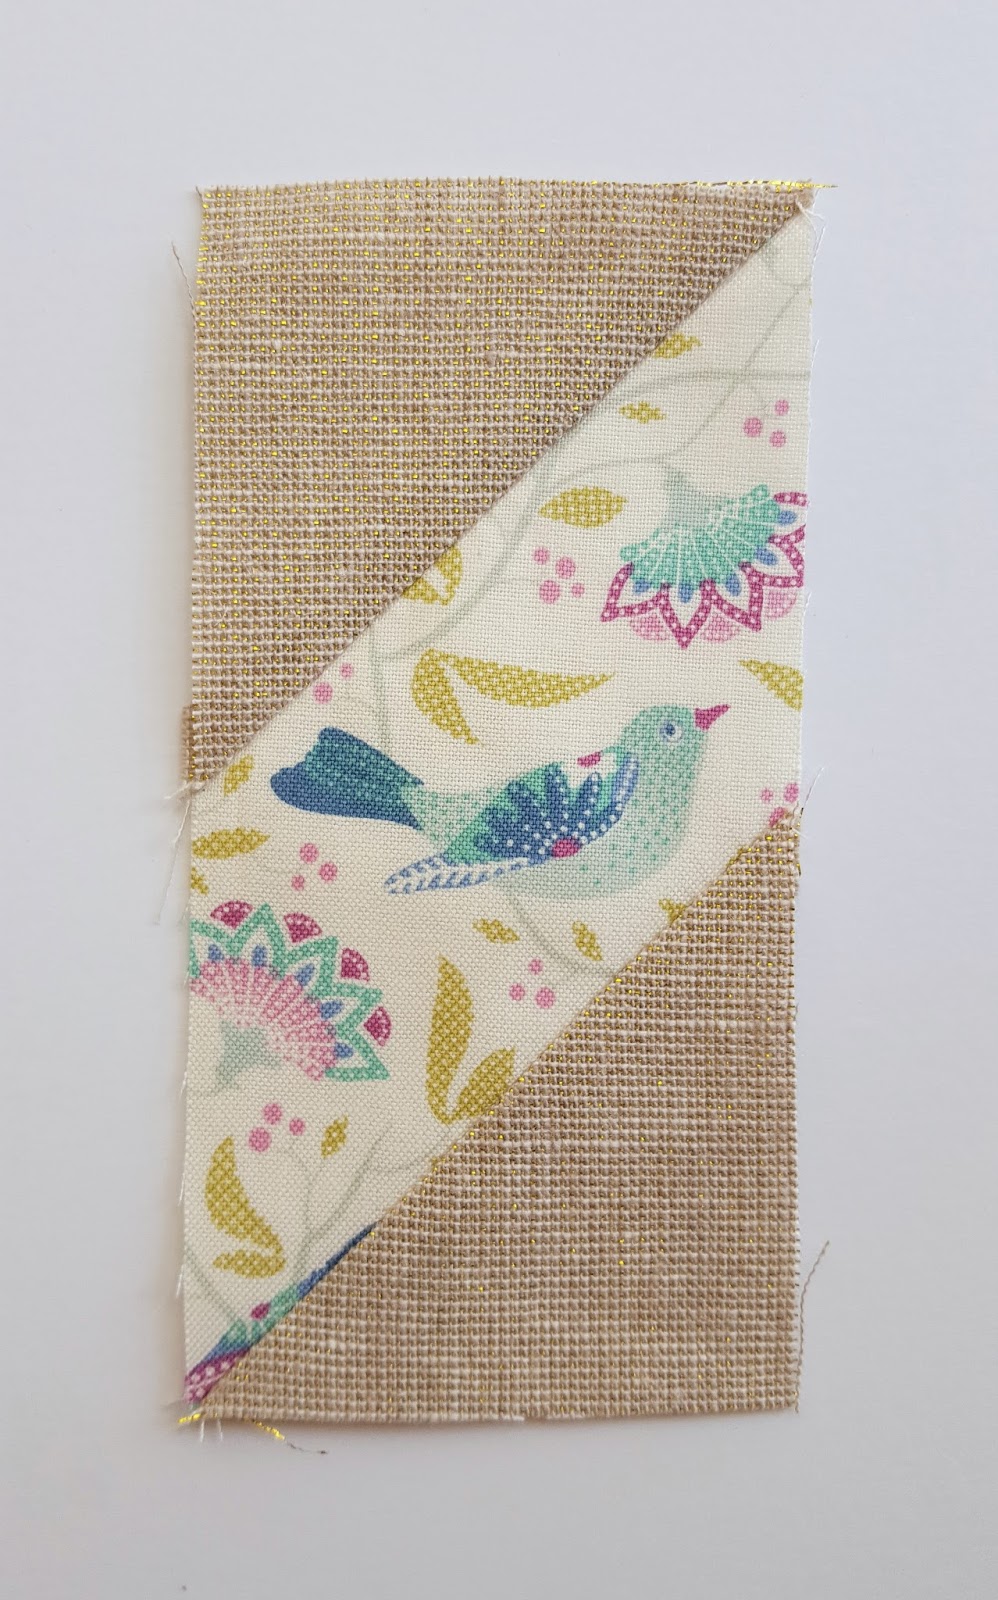
With right sides together, place a G square in the top right corner of an H square. Stitch across the diagonal line, trim a 1/4” seam allowance, and press the seam open. Repeat with 3 more G squares in the remaining 3 corners of the H square. Trim the square to 2 1/2 x 2 1/2”.
Repeat the previous step with the remaining G and H squares, giving you 6 square-within-a-square units.
Sew the 6 square-within-a-square units together in a row.
Sew a strip I to the top and bottom edges of the row of squares.
Sew the lower edge of the roof unit to the upper edge of the building unit.
3. Finish the block
Sew a strip K to the left and right edges of the building unit.
Sew strip J to the lower edge of the building unit.
Sew rectangle L to the upper edge of the building unit.
Store #4 (make 2)
Part of Block
|
Letter
|
Size of Piece
|
Building
|
A
|
1 strip 1 1/2 x 12 1/2”
|
B
|
1 strip 1 1/2 x 5 1/2”
|
C
|
2 strips 1 1/2 x 4 1/2”
|
D
|
1 strip 1 1/2 x 9 1/2”
|
Window
|
E
|
1 rectangle 4 1/2 x 7 1/2”
|
Door
|
F
|
1 rectangle 2 1/2 x 5 1/2”
|
Roof
|
G
|
3 squares 2 1/2 x 2 1/2”
|
H
|
6 squares 1 1/2 x 1 1/2”
|
I
|
3 squares 2 1/2 x 2 1/2”
|
J
|
6 squares 1 1/2 x 1 1/2”
|
K
|
2 strips 1 1/2 x 12 1/2”
|
Sidewalk
|
L
|
1 strip 1 1/2 x 14 1/2”
|
Background
|
M
|
2 strips 1 1/2 x 10 1/2”
|
N
|
1 rectangle 3 1/2 x 14 1/2”
|
Piecing Instructions
1. Assemble the building.
Sew a strip C on either long side of rectangle E.
Sew strip D to the lower edge of the window unit.
Sew strip B to the left edge of rectangle F.
Sew the door unit to the left edge of the window unit.
Sew strip A to the upper edge of the building unit.
2. Assemble the roof.
Draw a diagonal line from corner to corner on the back side of each H and J square or simply press each square in half diagonally, creating that line with your iron.
With right sides together, place a J square in the upper right corner of a G square. Stitch across the diagonal line, trim a 1/4” seam allowance, and press the seam open. Repeat with another J square in the lower right corner of the G square. Trim the square to 2 1/2 x 2 1/2”.
Repeat the previous step with the remaining J and G squares, and then repeat again with the H and I squares, giving you 6 chevron units.
Sew the 6 chevron units together in a row.
Sew a strip K to the top and bottom edges of the row of squares.
Sew the lower edge of the roof unit to the upper edge of the building unit.
3. Finish the block
Sew a strip M to the left and right edges of the building unit.
Sew strip L to the lower edge of the building unit.
Sew rectangle N to the upper edge of the building unit.
Store #5 (make 2)
Part of Block
|
Letter
|
Size of Piece
|
Building
|
A
|
2 strips 1 1/2 x 4 1/2”
|
B
|
1 strip 1 1/2 x 9 1/2”
|
C
|
1 strip 1 1/2 x 5 1/2”
|
D
|
1 strip 1 1/2 x 12 1/2”
|
Window
|
E
|
1 rectangle 4 1/2 x 7 1/2”
|
Door
|
F
|
1 rectangle 2 1/2 x 5 1/2”
|
Roof
|
G
|
3 rectangles 2 1/2 x 4 1/2”
|
H
|
3 rectangles 2 1/2 x 4 1/2”
|
Sidewalk
|
I
|
1 strip 1 1/2 x 14 1/2”
|
Background
|
J
|
2 strips 1 1/2 x 10 1/2”
|
K
|
1 rectangle 3 1/2 x 14 1/2”
|
Piecing Instructions
1. Assemble the building.
Sew two A strips to either short side of E rectangle.
Sew B strip to the lower edge of the window unit.
Sew F rectangle to the right edge of the unit and C strip to the right edge of F.
Sew D strip to the upper edge of the unit.
2. Assemble the roof.
Match up the G and H rectangles into 3 pairs, alternating prints and keeping the rectangles vertical. Sew each pair together along the long edge between them.
Sew the pairs together, again along the long edges, forming a row of 6 vertical rectangles.
Sew the lower edge of the roof unit to the upper edge of the building unit.
3. Finish the block
Sew a strip J to the left and right edges of the building unit.
Sew strip I to the lower edge of the building unit.
Sew rectangle K to the upper edge of the building unit.
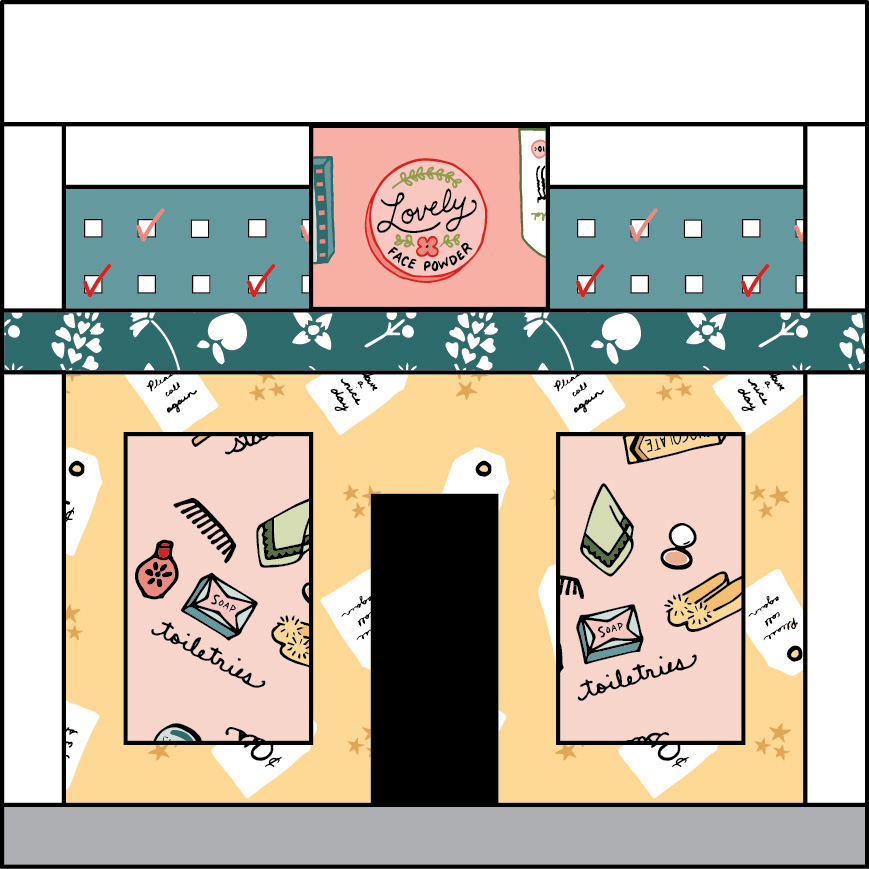
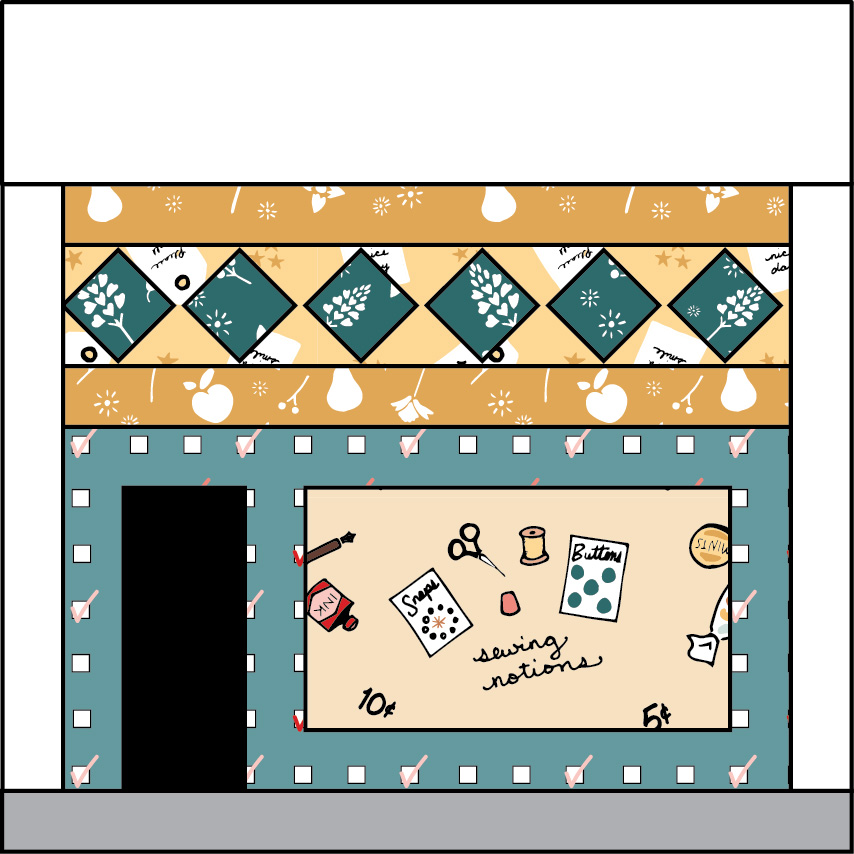
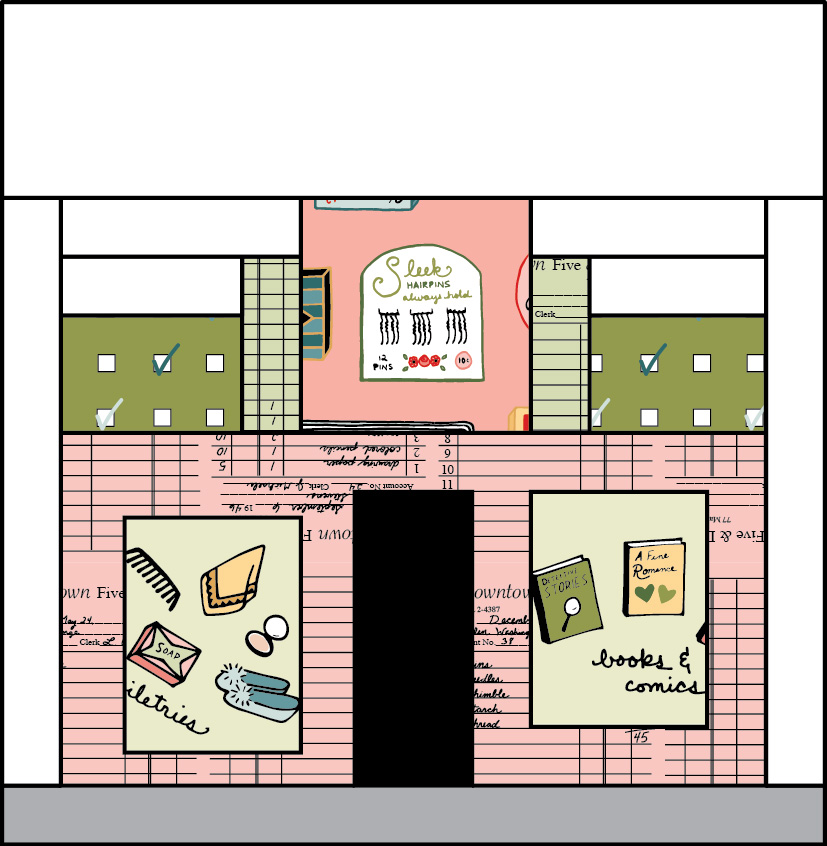
Store #6 (Make 2)
Part of Block
|
Letter
|
Size of Piece
|
Building
|
A
|
1 strip 1 1/2 x 12 1/2”
|
B
|
4 strips 1 1/2 x 4 1/2”
|
C
|
2 strips 1 1/2 x 5 1/2”
|
Windows
|
D
|
2 rectangles 3 1/2 x 4 1/2”
|
Door
|
E
|
1 rectangle 2 1/2 x 5 1/2”
|
Roof
|
F
|
2 strips 1 1/2 x 3 1/2”
|
G
|
2 rectangles 2 1/2 x 3 1/2”
|
Sign
|
H
|
1 square 4 1/2 x 4 1/2”
|
Sidewalk
|
I
|
1 strip 1 1/2 x 14 1/2”
|
Background
|
J
|
2 strips 1 1/2 x 10 1/2”
|
K
|
2 strips 1 1/2 x 3 1/2”
|
L
|
2 strips 1 1/2 x 4 1/2”
|
M
|
1 rectangle 3 1/2 x 14 1/2”
|
Piecing Instructions
1. Assemble the building.
Sew a strip B on either long side of each rectangle D, giving you 2 window units.
Sew a strip C to the lower edge of each window unit.
Sew a window unit to each of the long edges of rectangle E.
Sew strip A to the upper edge of the building unit.
2. Assemble the roof.
Sew a strip K to the upper long edge of each G rectangle.
Sew a strip F to the right edge of one roof unit and another strip F to the left edge of the other roof unit.
Sew a strip L to the upper edge of each roof unit.
Lay out in a row from left to right: roof unit with strip F on the right, square H, and roof unit with strip F on the left. Sew them together.
Sew the lower edge of the roof unit to the upper edge of the building unit.
3. Finish the block
Sew a strip J to the left and right edges of the building unit.
Sew strip I to the lower edge of the building unit.
Sew rectangle M to the upper edge of the building unit.`
Finish the Quilt
Part of Quilt
|
Letter
|
Size of Piece
|
Sashing for lower edge
|
A
|
1 rectangle 3 1/2 x WOF
1 rectangle 3 1/2 x 7”
|
Sashing for side edges
|
B
|
4 rectangles 3 1/2 x 30”
|
Batting
|
C
|
1 rectangle 51 x 62”
|
Backing
|
D
|
2 rectangles 26 x 62”
|
Binding
|
E
|
6 strips 2 1/4” x width of fabric
|
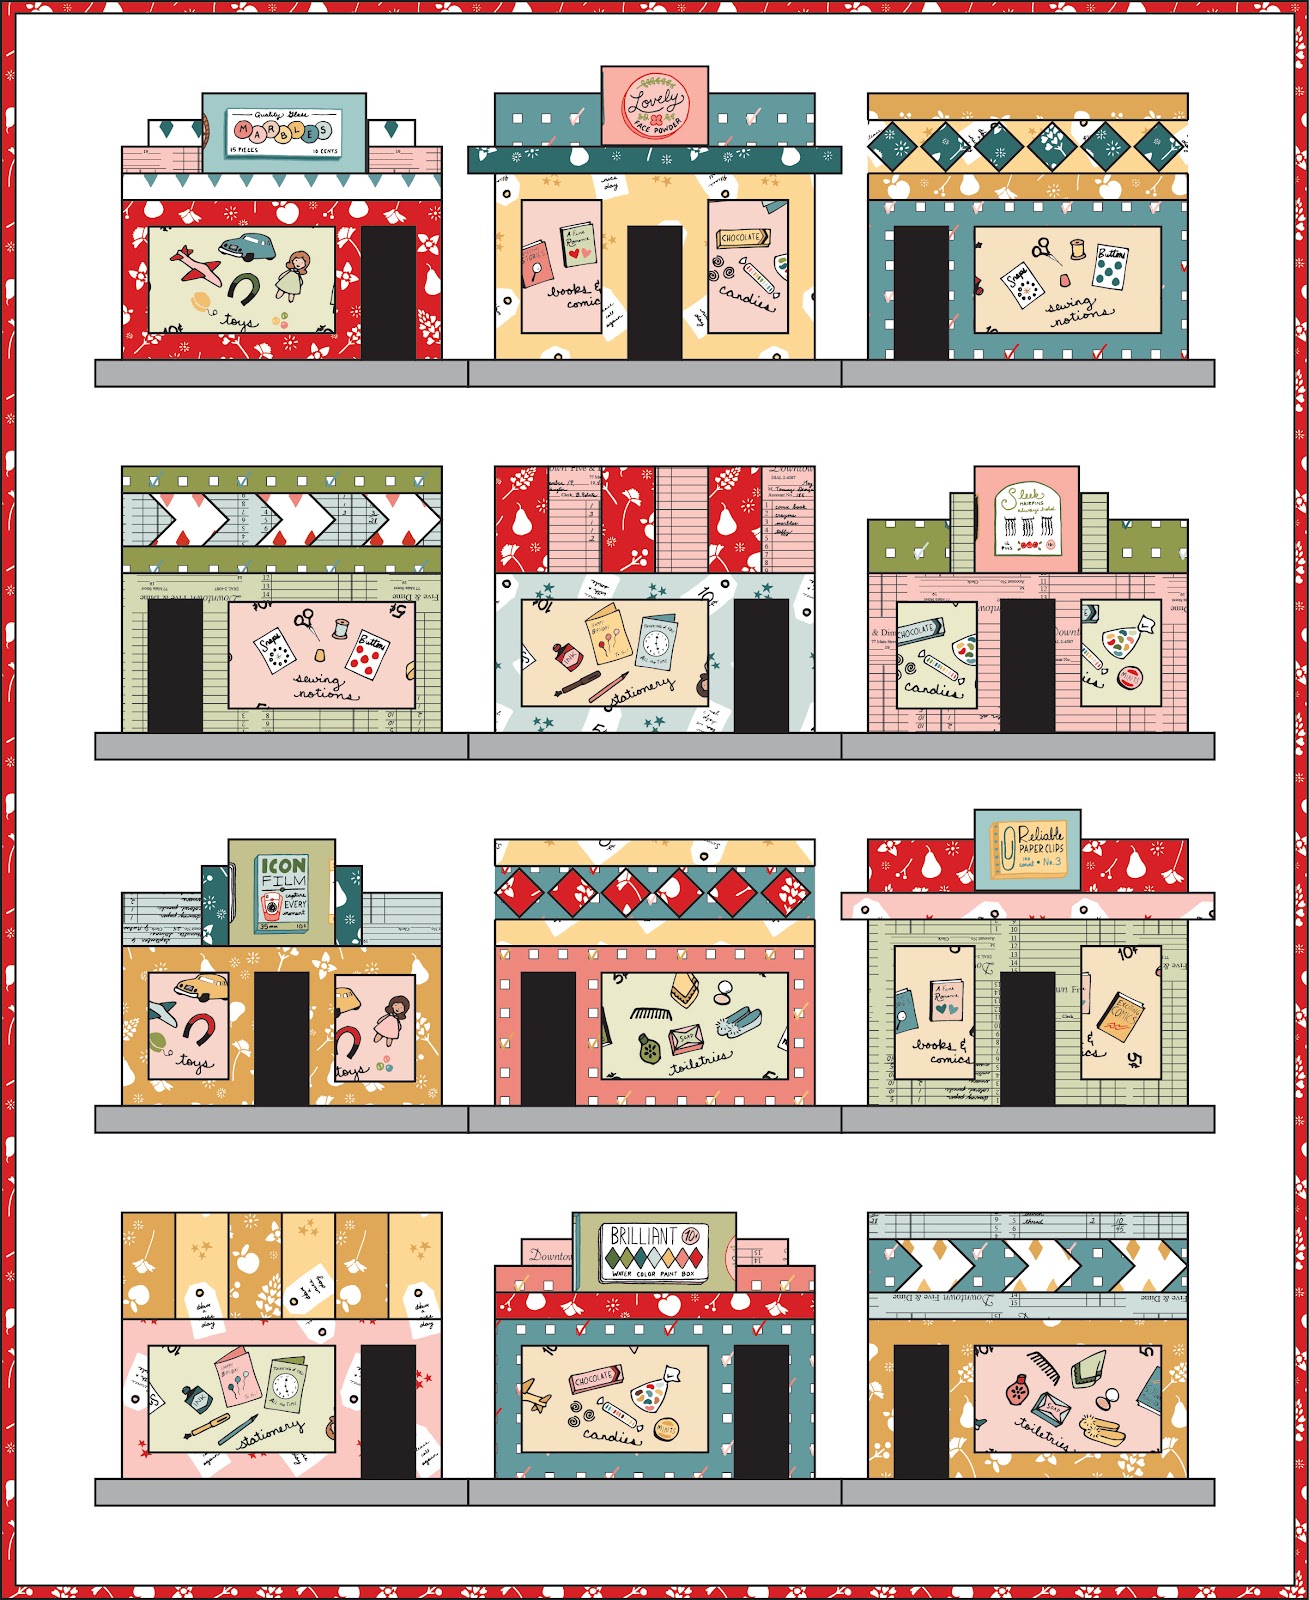
1. Arrange quilt blocks as desired (see diagram earlier in the pattern for suggestion). Sew
blocks together in 4 rows of 3 blocks each.
2. Sew the 4 rows together to create a grid of 12 blocks, 4 high and 3 wide.
3. Sew both A rectangles together to make a 3 1/2 x 48” rectangle. Sew this rectangle to the
lower edge of the quilt top.
4. Sew 2 B rectangles together to make a 3 1/2 x 59 1/2” rectangle. Repeat with the other B
rectangles. Sew these to the right and left edges of the quilt top.
5. Stack in this order from bottom to top: D (right side down), C, and quilt top (right side up).
Baste with pins or adhesive basting spray and quilt as desired.
6. Trim off excess batting and backing. Sew the E strips together at the short ends to make a
long strip of quilt binding. Press seams open and press the strip in half lengthwise, wrong
sides of the fabric together.
7. Use the binding to bind your quilt by hand or machine.
Remember, if you make one of these quilts or blocks, please share them on social media with the hashtag #storefrontsquilt and be sure to tag me @fabricmutt!